本文基于android9.0.0_r3版本源码,源码查看工具是XRef
0.前言
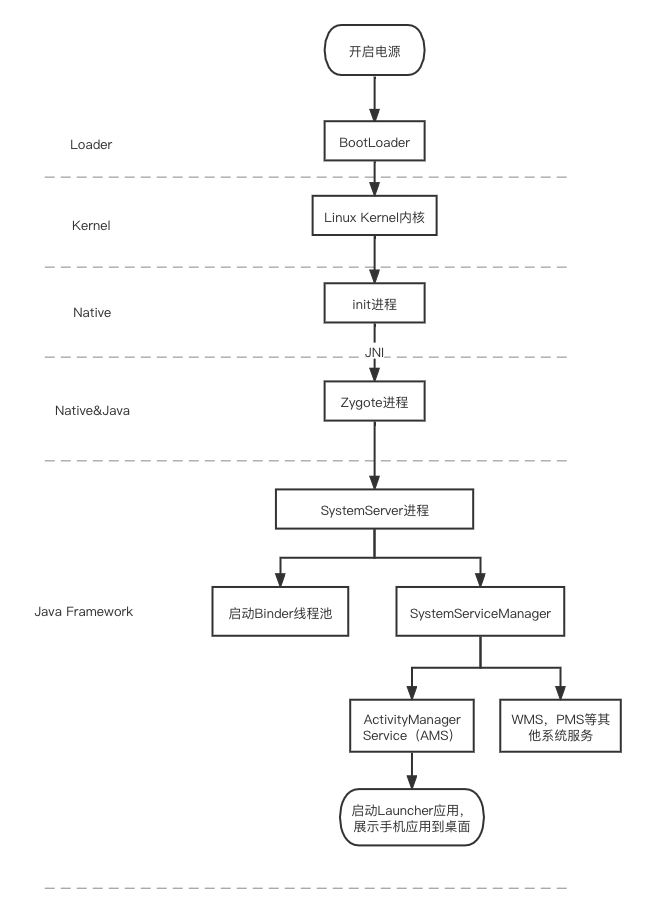
长按电源键后,系统加载BootLoader到内存中,并拉起Linux kernel内核,然后启动第一个用户空间的进程,init进程,在init进程中,启动Zygote进程,随后所有的应用进程,都由Zygote进程创建,Zygote进程创建之后,启动Binder线程池和SystemServer进程,在SystemServier进程中对系统服务进行创建,启动和管理,包括AMS,PMS,再由AMS启动Launcher,Launcher启动后,将应用的快捷图标显示在桌面上。以上,是Android系统的主要启动流程,后文会对其中几个主要步骤展开学习。
流程图如下:

1.init进程
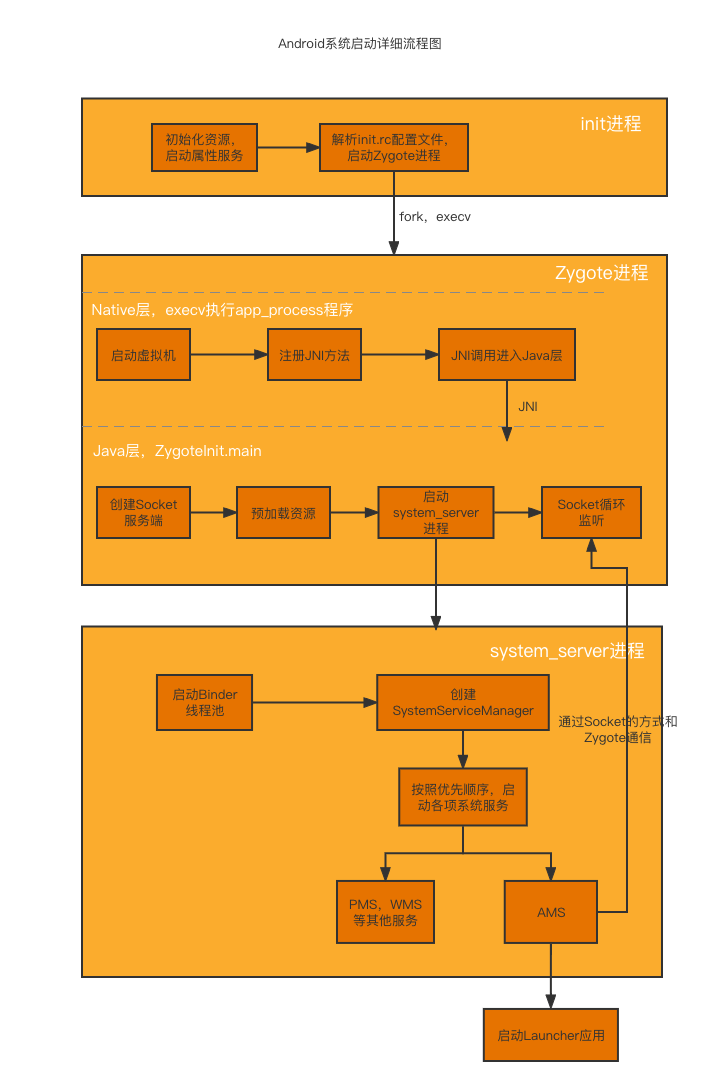
init进程是系统空间内的第一个进程,进程负责初始化资源文件和启动一系列的属性服务,然后解析init.rc这个配置文件,通过fork和execv来启动Zygote进程。
2.Zygote进程
包括system系统进程在内的所有应用进程,都是Zygote进程负责创建的,因此Zygote进程也被称为进程孵化器,它创建进程的方式是通过复制自身来创建应用进程的,它在启动过程中会在内部创建一个虚拟机实例,所以通过复制Zygote进程而得到的进程,可以快速地在内部获得一个虚拟机实例拷贝。
首先运行可执行程序app_process的入口main函数,主要做以下几件事:
1)启动Zygote,执行AndroidRuntime.start函数;
2)启动VM虚拟机;
3)注册Android系统框架JNI调用到虚拟机中;
4)通过JNI调用进入java层执行ZygoteInit的main函数:
经过以上的步骤,调用到了Java层的ZygoteInit内,代码如下:
**/frameworks/base/core/java/com/android/internal/os/ZygoteInit.java

public static void main(String argv[]) {
    ZygoteServer zygoteServer = new ZygoteServer();

    // Mark zygote start. This ensures that thread creation will throw
    // an error.
    ZygoteHooks.startZygoteNoThreadCreation();

    // Zygote goes into its own process group.
    try {
        Os.setpgid(0, 0);
    } catch (ErrnoException ex) {
        throw new RuntimeException("Failed to setpgid(0,0)", ex);
    }

    final Runnable caller;
    try {
        // Report Zygote start time to tron unless it is a runtime restart
        if (!"1".equals(SystemProperties.get("sys.boot_completed"))) {
            MetricsLogger.histogram(null, "boot_zygote_init",
                    (int) SystemClock.elapsedRealtime());
        }

        String bootTimeTag = Process.is64Bit() ? "Zygote64Timing" : "Zygote32Timing";
        TimingsTraceLog bootTimingsTraceLog = new TimingsTraceLog(bootTimeTag,
                Trace.TRACE_TAG_DALVIK);
        bootTimingsTraceLog.traceBegin("ZygoteInit");
        RuntimeInit.enableDdms();

        boolean startSystemServer = false;
        String socketName = "zygote";
        String abiList = null;
        boolean enableLazyPreload = false;
        for (int i = 1; i < argv.length; i++) {
            if ("start-system-server".equals(argv[i])) {
                //在init.rc文件中,如果有--start-system-server参数,表示要创建SystemServer
                startSystemServer = true;
            } else if ("--enable-lazy-preload".equals(argv[i])) {
                enableLazyPreload = true;
            } else if (argv[i].startsWith(ABI_LIST_ARG)) {
                abiList = argv[i].substring(ABI_LIST_ARG.length());
            } else if (argv[i].startsWith(SOCKET_NAME_ARG)) {
                socketName = argv[i].substring(SOCKET_NAME_ARG.length());
            } else {
                throw new RuntimeException("Unknown command line argument: " + argv[i]);
            }
        }

        if (abiList == null) {
            throw new RuntimeException("No ABI list supplied.");
        }

        //1.创建Socket服务端
        zygoteServer.registerServerSocketFromEnv(socketName);
        // In some configurations, we avoid preloading resources and classes eagerly.
        // In such cases, we will preload things prior to our first fork.
        if (!enableLazyPreload) {
            bootTimingsTraceLog.traceBegin("ZygotePreload");
            EventLog.writeEvent(LOG_BOOT_PROGRESS_PRELOAD_START,
                SystemClock.uptimeMillis());
            //2.预加载资源
            preload(bootTimingsTraceLog);
            EventLog.writeEvent(LOG_BOOT_PROGRESS_PRELOAD_END,
                SystemClock.uptimeMillis());
            bootTimingsTraceLog.traceEnd(); // ZygotePreload
        } else {
            Zygote.resetNicePriority();
        }

        // Do an initial gc to clean up after startup
        bootTimingsTraceLog.traceBegin("PostZygoteInitGC");
        gcAndFinalize();
        bootTimingsTraceLog.traceEnd(); // PostZygoteInitGC

        bootTimingsTraceLog.traceEnd(); // ZygoteInit
        // Disable tracing so that forked processes do not inherit stale tracing tags from
        // Zygote.
        Trace.setTracingEnabled(false, 0);

        Zygote.nativeSecurityInit();

        // Zygote process unmounts root storage spaces.
        Zygote.nativeUnmountStorageOnInit();

        ZygoteHooks.stopZygoteNoThreadCreation();

        if (startSystemServer) {
            //3.fork启动system_server进程
            Runnable r = forkSystemServer(abiList, socketName, zygoteServer);

            // {@code r == null} in the parent (zygote) process, and {@code r != null} in the
            // child (system_server) process.
            if (r != null) {
                r.run();
                return;
            }
        }

        Log.i(TAG, "Accepting command socket connections");

        // The select loop returns early in the child process after a fork and
        // loops forever in the zygote.
        //4.socket服务端等待AMS请求(AMS会通过socket请求Zygote来创建应用程序进程)
        caller = zygoteServer.runSelectLoop(abiList);
    } catch (Throwable ex) {
        Log.e(TAG, "System zygote died with exception", ex);
        throw ex;
    } finally {
        zygoteServer.closeServerSocket();
    }

    // We're in the child process and have exited the select loop. Proceed to execute the
    // command.
    if (caller != null) {
        caller.run();
    }
}
从代码中可以看到,主要做了以下的事,
1)创建Socket服务端;
2)预加载类,资源等,基于linux的copy-on-write机制,可以加速后续Zygote fork创建进程的启动速度;
3)fork创建启动系统system_server进程;
4)Socket服务端进入循环监听等待,等待后续AMS请求(AMS会通过Socket请求Zygote来创建应用进程)。
3.system_server进程的启动
上文提到,通过forkSystemServer()方法创建system_server进程,跟踪代码可以发现,会先设置相关参数,然后再创建system_server进程,进程创建之后,调用native方法ZygoteInit.nativeZygoteInit();启动进程的Binder线程池,然后调用RuntimeInit.applicationInit()方法,这个方法最终会通过反射的方式创建com.android.server.SystemServer类对象,并执行其main函数,main函数代码如下:
/**
 * The main entry point from zygote.
 */
public static void main(String[] args) {
    new SystemServer().run();
}

private void run() {
    ...
    //1.创建主线程Looper
    Looper.prepareMainLooper();

    //2.创建系统Context上下文
    createSystemContext();


    // Create the system service manager.
    //3.创建SystemServiceManager,用于后续系统服务(AMS,WMS,PMS)的创建、启动、生命周期管理
    mSystemServiceManager = new SystemServiceManager(mSystemContext);
    mSystemServiceManager.setStartInfo(mRuntimeRestart,
            mRuntimeStartElapsedTime, mRuntimeStartUptime);
    LocalServices.addService(SystemServiceManager.class, mSystemServiceManager);

    //4.根据优先级,分批启动服务
    traceBeginAndSlog("StartServices");
    //启动引导服务,如AMS,PMS等
    startBootstrapServices();
    //启动核心服务
    startCoreServices();
    //启动其他服务
    startOtherServices();
    SystemServerInitThreadPool.shutdown();

    // Loop forever.
    //5.开启looper循环
    Looper.loop();

}
在system_server进程创建之后,主要做了以下几件事:
1)启动进程的Binder线程池;
2)创建SystemServiceManager,用于后续系统服务(AMS,PMS,WMS等)的创建、启动、生命周期管理;
3)用SystemServiceManager按照优先级启动系统服务;
4)创建并启动进程主线程的loop循环。
4.Launcher应用启动
在system_server进程中,创建了SystemServiceManager,然后创建了AMS等系统服务,当所有服务创建完成后,会调用到frameworks/base/services/core/java/com/android/server/am/ActivityManagerService.java
里面的systemReady()方法,并在层层调用后,最终调用startHomeActivity启动Category类型为CATEGORY_HOME类型的应用,也就是Launcher桌面,至此,完成了系统的整个启动流程。
详细启动流程图如下:
